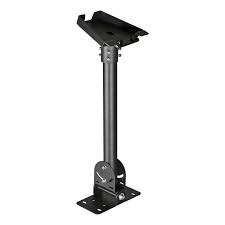
Starlink Gen 3 Mounting Stand Kenya – Ultra-Detailed Ground Setup, Temporary Installation & Outdoor Deployment Guide 2026 The Starlink Gen 3 Mounting Stand is the ground support stand used with the Starlink Standard Gen 3 / Standard...
The Starlink Gen 3 Mounting Stand is the ground support stand used with the Starlink Standard Gen 3 / Standard 4X Kit. It allows users to place the Starlink dish on a flat surface during setup, testing, temporary deployments, camping, relocation, or short-term use before moving to a permanent wall, roof, pole, or pipe mount installation.
The Standard 4X setup guide confirms that the Starlink kit includes a kickstand, and users are instructed to lift the kickstand, plug in the Starlink cable, and place the Starlink with a clear view of the sky during setup.Starlink also explains that the kickstand can be removed from Standard or Mini systems by squeezing the release tab at the back and pulling the mount away.
The Gen 3 Mounting Stand is useful for:
home testing
temporary Starlink setup
rentals
camping
construction sites
outdoor events
rural field use
backup internet
quick relocation
signal testing before permanent installation
However, for long-term rooftop, wall, or pole installation, users may need stronger accessories such as wall mounts, pipe adapters, pole mounts, or roof mounts depending on the site. Starlink recommends using the Starlink app to find a clear sky location for best performance.
| Stand / Mount Type | Estimated Kenya Price | Best Use |
|---|---|---|
| Gen 3 Replacement Kickstand | KSh 3,000 – 8,000 | Replacing lost/damaged stand |
| Basic Gen 3 Ground Stand | KSh 4,000 – 10,000 | Temporary outdoor setup |
| Heavy-Duty Gen 3 Tripod Stand | KSh 8,000 – 20,000 | Camping and field use |
| Adjustable Gen 3 Stand | KSh 10,000 – 25,000 | Flexible outdoor placement |
| Professional Mounting Package | KSh 15,000 – 60,000+ | Homes, offices, sites |
Kenyan accessory listings show Starlink Gen 3 mounting kits around KSh 5,999, while related wall mounts commonly appear between KSh 6,699 – KSh 7,999 depending on seller and package.
| Component | Basic Home Setup | Camping Setup | Construction Site Setup |
|---|---|---|---|
| Starlink Gen 3 Kit | KSh 45,000 – 65,000 | KSh 45,000 – 65,000 | KSh 45,000 – 65,000 |
| Mounting Stand | KSh 5,000 | KSh 10,000 | KSh 15,000 |
| Cable Clips | KSh 500 – 2,000 | KSh 1,000 – 3,000 | KSh 2,000 – 5,000 |
| UPS / Power Backup | Optional | KSh 20,000 – 80,000 | KSh 40,000 – 150,000 |
| Weather Protection | Optional | KSh 3,000 – 10,000 | KSh 5,000 – 20,000 |
| Estimated Total | KSh 50,500 – 72,000 | KSh 79,000 – 168,000 | KSh 97,000 – 255,000 |
| Problem Without Proper Stand | Result | Mounting Stand Benefit |
|---|---|---|
| Dish placed directly on ground | Dirt and instability | Cleaner placement |
| Unstable temporary setup | Dish movement | Better support |
| Poor testing position | Wrong signal readings | Easier testing |
| Frequent relocation | Setup delays | Faster deployment |
| Cable scattered on ground | Cable strain | Cleaner routing |
| User Type | Suitability |
|---|---|
| Home users testing Starlink | Excellent |
| Campers | Good |
| Construction sites | Good |
| Outdoor events | Good |
| Rural homes | Excellent |
| Permanent rooftop users | Temporary only |
| Large offices | Not enough alone |
The Starlink Gen 3 Mounting Stand is most useful for temporary, portable, and testing setups. For permanent installations, it should be replaced with a stronger wall, roof, or pole mounting solution.
| Specification | Details |
|---|---|
| Product Type | Ground mounting stand / kickstand |
| Compatibility | Starlink Standard Gen 3 / Standard 4X |
| Included in Kit | Yes, Standard 4X kit includes kickstand |
| Setup Type | Temporary or semi-temporary |
| Installation Surface | Flat, stable surface |
| Removal Method | Release-tab removal |
| Best Use | Setup, testing, camping, temporary placement |
The Standard 4X setup guide lists the kickstand as included with the kit, together with the Standard Starlink, Router 3, 15 m Starlink cable, AC power cable, power supply, and plug.
| Starlink Kit | Compatibility |
|---|---|
| Starlink Standard Gen 3 | Yes |
| Starlink Standard 4X | Yes |
| Starlink V4 / Standard Kit | Yes |
| Starlink Mini | No, different stand system |
| Standard Actuated Gen 2 | No |
| High Performance Kit | No |
| Enterprise Kit | No |
| Mounting Option | Best Use | Stability |
|---|---|---|
| Gen 3 Mounting Stand | Temporary ground use | Moderate |
| Wall Mount | Permanent wall setup | High |
| Pipe Adapter | Pole installation | High |
| Roof Mount | Permanent rooftop setup | High |
| Tripod Stand | Portable elevated use | Good |
| Kickstand Replacement | Original-style support | Moderate |
Starlink Standard accessories include mounting options such as wall mounts and pipe adapters for more secure permanent installations; Starlink’s Standard Wall Mount is designed for exterior wall installation near a gable or fascia and supports up to a 4-inch overhang.
| Feature | Benefit |
|---|---|
| Lightweight design | Easy to carry |
| Ground support shape | Quick setup |
| Removable design | Easy mount upgrade |
| Outdoor-compatible use | Good for temporary deployments |
| No drilling required | Simple placement |
Replacement Gen 3 kickstand listings describe the stand as compatible with Starlink Gen 3 / V4 terminals and made from durable, weather-resistant materials for outdoor ground support.
The Gen 3 Mounting Stand is designed for simplicity, portability, and quick setup rather than permanent structural installation.
| Step | Action |
|---|---|
| 1 | Open or attach the Gen 3 mounting stand |
| 2 | Place the dish on a flat, stable surface |
| 3 | Connect the Starlink cable to the dish |
| 4 | Route cable safely to Router 3 |
| 5 | Connect Router 3 to power |
| 6 | Open the Starlink app |
| 7 | Check for obstructions |
| 8 | Run speed and stability tests |
Starlink’s Standard 4X setup instructions tell users to lift the kickstand, plug in the Starlink cable, route it to Router 3, connect power, and use the Starlink app for setup.
| Placement Location | Suitability |
|---|---|
| Flat rooftop slab | Excellent |
| Open compound | Good |
| Balcony with sky view | Good |
| Garden area | Good if unobstructed |
| Near trees | Poor |
| Under roof overhang | Poor |
| Near tall wall | Poor |
| Surface Type | Recommendation |
|---|---|
| Concrete slab | Excellent |
| Flat roof | Excellent |
| Paved compound | Good |
| Grass | Use caution |
| Loose soil | Not ideal |
| Sloped surface | Avoid |
| Vehicle roof | Not recommended without proper mount |
| Cable Routing Area | Recommendation |
|---|---|
| Ground setup | Avoid foot traffic |
| Rooftop setup | Use clips or conduit |
| Outdoor routing | Avoid sharp bends |
| Door entry | Avoid cable pinching |
| Long-term use | Use permanent cable protection |
Correct placement is critical because the stand itself does not solve obstruction problems. The Starlink dish still needs a clear view of the sky.
| Use Case | Suitability |
|---|---|
| Testing signal before installation | Excellent |
| Short-term rental setup | Excellent |
| Camping | Good |
| Construction site | Good |
| Outdoor event | Good |
| Permanent home setup | Not ideal |
| Alternative Mount | Best For |
|---|---|
| Wall Mount | Homes and offices |
| Pipe Adapter | Existing poles |
| Roof Mount | Permanent rooftop use |
| Pivot Mount | Angled roof setups |
| Tripod Stand | Portable elevated use |
| Sign | Recommended Action |
|---|---|
| Frequent wind movement | Install permanent mount |
| Trees blocking signal | Use pole/roof mount |
| Cable exposed to damage | Route permanently |
| Dish must stay outside daily | Use wall/roof mount |
| Business depends on Starlink | Use professional installation |
| Limitation | Impact |
|---|---|
| Lower height | More obstruction risk |
| Ground exposure | More dust/water risk |
| Easier movement | Reduced stability |
| Cable exposure | Damage risk |
| Not ideal in wind | Possible shifting |
The Gen 3 Mounting Stand is excellent for testing and short-term use, but a proper permanent mount is better for long-term reliability.
| Home Scenario | Suitability |
|---|---|
| Testing before roof installation | Excellent |
| Temporary apartment setup | Good |
| Rural home trial setup | Excellent |
| Backup internet setup | Good |
| Permanent exposed outdoor setup | Moderate |
| Business Scenario | Suitability |
|---|---|
| Temporary office internet | Good |
| Construction site | Good |
| Outdoor activation testing | Excellent |
| Permanent office internet | Use stronger mount |
| Lodge deployment | Use permanent mount after testing |
| Scenario | Suitability |
|---|---|
| Camping | Good |
| Outdoor events | Good |
| Field testing | Excellent |
| Moving vehicles | Not recommended |
| Safari vehicles | Use roof rack/mobility mount |
| Obstruction | Stand-Based Solution |
|---|---|
| Trees | Move to open area |
| Tall wall | Place on higher surface |
| Roof overhang | Move outside overhang |
| Nearby building | Shift to open side |
| Low compound | Upgrade to pole mount |
In Kenya, the Gen 3 Mounting Stand works best as a quick testing tool before committing to the final installation location.
When buying a Starlink Gen 3 Mounting Stand or replacement stand, many users make the mistake of choosing low-quality generic supports that may not fit properly, hold the dish securely, or survive outdoor conditions. A weak stand can cause the dish to shift, fall, lose alignment, or expose the cable to unnecessary strain.
This is why buying from Starlite Internet Kenya is a better choice. Starlite helps customers choose the right accessory depending on whether they need a temporary stand, a replacement kickstand, a wall mount, a pole mount, a pipe adapter, or a full professional installation. That guidance prevents wrong purchases and improves long-term Starlink performance.
Starlite Internet Kenya also assists with Starlink placement planning, obstruction checks, cable routing, power backup advice, router placement, Wi-Fi coverage planning, and professional installation recommendations. This matters because Starlink performance depends on more than just the kit; it also depends on where the dish is placed and how well the cable, router, and power system are set up.
For homes, offices, lodges, farms, schools, construction sites, and rural deployments, Starlite Internet Kenya provides practical local support that helps customers move from temporary stand setup to a more reliable long-term installation when needed.
It is the ground support stand or kickstand used with the Starlink Standard Gen 3 / Standard 4X dish for temporary placement and setup.
Yes. The Standard 4X setup guide lists the kickstand as part of the kit.
No. Starlink Mini uses a different mounting system.
It is better for temporary or short-term use. For permanent setups, use a wall mount, pipe adapter, roof mount, or pole mount.
Yes. Starlink says to squeeze the release tab at the back of the mount and pull the kickstand away.
Yes, but only on a flat, stable, safe surface. For long-term rooftop use, a fixed mount is better.
Not ideally. A permanent wall, pole, or roof mount is safer in windy conditions.
Replacement or basic mounting options can range from about KSh 3,000 – 10,000, while full mounting kits may be around KSh 5,999+ depending on seller and design.
Testing signal, temporary setup, camping, quick relocation, and initial installation before choosing a permanent mount.
Not directly. It helps position the dish, but speed depends on clear sky visibility, network conditions, obstruction level, and service plan.
A wall mount, pipe adapter, roof mount, pole mount, or professional installation package.
From Starlite Internet Kenya for genuine accessories, placement guidance, installation support, and nationwide Starlink assistance.
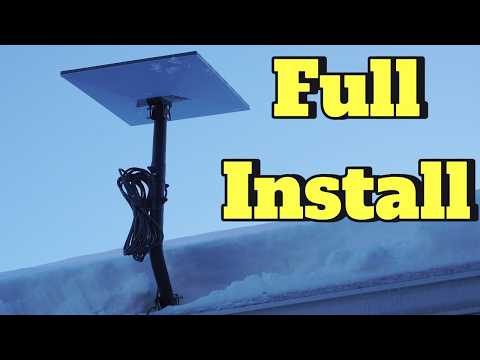
The video above demonstrates how the Starlink Gen 3 Mounting Stand helps users set up the Standard Gen 3 / Standard 4X dish quickly for temporary use, testing, camping, outdoor placement, and initial installation. It shows why a stable surface and clear sky view are important when using the stand.
It also highlights key setup considerations such as lifting or attaching the stand, placing the dish correctly, routing the Starlink cable safely, powering the Router 3, and using the Starlink app to check for obstructions. These steps are important because the mounting stand works best when the dish is placed in an open area without trees, walls, or roof overhangs blocking the sky.
For Kenyan users, this video is especially useful for testing Starlink in homes, farms, construction sites, lodges, rural compounds, apartments, and temporary outdoor setups before deciding whether to upgrade to a permanent wall, roof, or pole mount installation.
The Starlink Gen 3 Mounting Stand is a useful accessory for temporary setup, signal testing, camping, short-term deployments, and quick placement of the Starlink Standard Gen 3 / Standard 4X dish.
It helps users:
test signal quality
find the best installation location
deploy Starlink quickly
avoid immediate wall or roof drilling
support short-term outdoor use
prepare for permanent installation
However, for long-term reliability in Kenyan homes, offices, lodges, farms, and business locations, users should consider a permanent wall, roof, pole, or pipe mount installation after testing the best location.
For genuine Starlink Gen 3 Mounting Stands, replacement kickstands, wall mounts, pipe adapters, cable routing support, obstruction checks, and professional Starlink installation guidance, visit Starlite Internet Kenya and let Starlite Internet Kenya help you set up your Starlink system reliably anywhere in Kenya.
Hello! How can we help you today?
Start Chat