
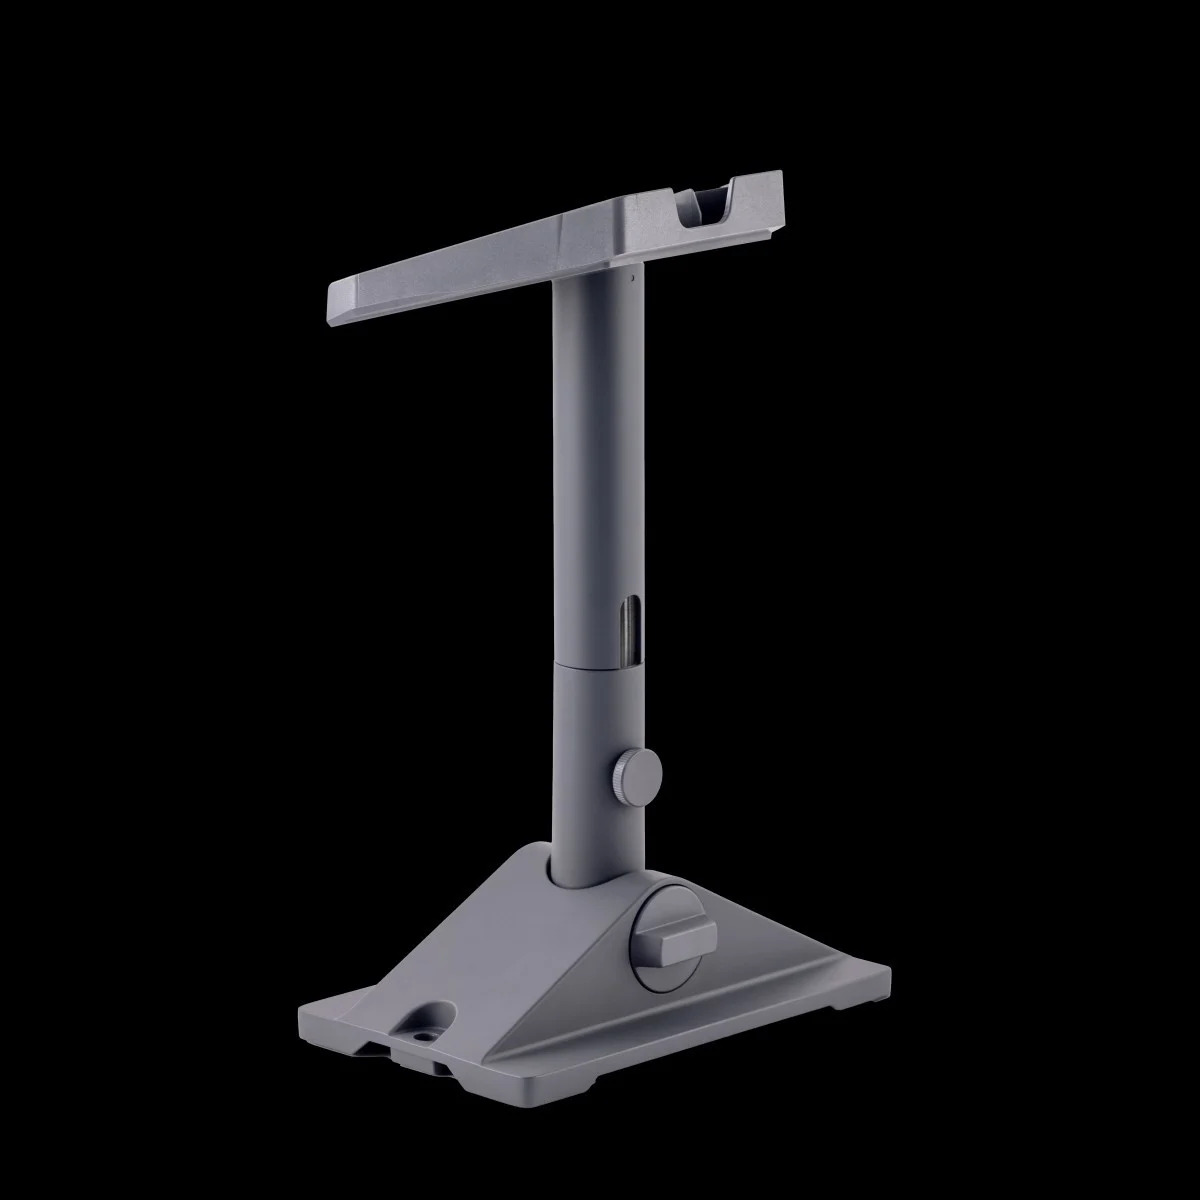
Starlink Standard Pivot Mount Kenya – Ultra-Detailed Roof, Wall & Outdoor Installation Guide 2026 The Starlink Standard Pivot Mount is a dedicated mounting accessory designed for the Starlink Standard Gen 3 / Standard 4X dish. It is ideal for...
The Starlink Standard Pivot Mount is a dedicated mounting accessory designed for the Starlink Standard Gen 3 / Standard 4X dish. It is ideal for users who want to install Starlink securely on sloped roofs, shingled roofs, fascia boards, walls, cabins, rural buildings, lodges, farmhouses, and outdoor structures where angle adjustment is needed for better dish positioning.
Unlike the temporary kickstand or ground stand, the Standard Pivot Mount is designed for more stable outdoor installation. It allows the installer to adjust the dish angle depending on the roof slope and location, helping the Starlink dish achieve a better sky view and a cleaner permanent setup.
The Pivot Mount is useful for:
Homes and apartments
Farms and rural compounds
Lodges and hotels
Offices and shops
Schools and clinics
Construction sites
Outdoor cabins
Remote field offices
Rooftop Starlink installations
| Pivot Mount Type | Estimated Kenya Price | Best Use |
|---|---|---|
| Basic Standard Pivot Mount | KSh 8,000 – 15,000 | Simple roof setups |
| Official Standard Pivot Mount | KSh 15,000 – 28,000 | Reliable Gen 3 installations |
| Heavy-Duty Roof Pivot Mount | KSh 25,000 – 45,000 | Windy or exposed areas |
| Pivot Mount + Cable Routing Kit | KSh 20,000 – 40,000 | Cleaner outdoor installs |
| Professional Installation Package | KSh 35,000 – 120,000+ | Homes, offices, lodges, farms |
| Component | Basic Home Setup | Farm / Rural Setup | Lodge / Office Setup |
|---|---|---|---|
| Starlink Standard Kit | KSh 45,000 – 65,000 | KSh 45,000 – 65,000 | KSh 45,000 – 65,000 |
| Standard Pivot Mount | KSh 15,000 | KSh 22,000 | KSh 30,000 |
| Cable Clips / Conduit | KSh 2,000 – 6,000 | KSh 5,000 – 15,000 | KSh 10,000 – 30,000 |
| Installation Labour | KSh 8,000 – 20,000 | KSh 15,000 – 35,000 | KSh 25,000 – 70,000 |
| Sealant / Waterproofing | KSh 1,000 – 3,000 | KSh 2,000 – 5,000 | KSh 3,000 – 8,000 |
| Estimated Total | KSh 71,000 – 109,000 | KSh 89,000 – 142,000 | KSh 113,000 – 203,000+ |
| Problem Without Pivot Mount | Result | Pivot Mount Benefit |
|---|---|---|
| Temporary kickstand setup | Unstable long-term placement | Stronger permanent installation |
| Sloped roof angle | Poor dish positioning | Adjustable angle support |
| Weak outdoor placement | Wind movement | Better stability |
| Poor cable routing | Cable damage | Cleaner cable path |
| Obstructed sky view | Internet interruptions | Better positioning flexibility |
| Buyer Type | Suitability |
|---|---|
| Home users | Excellent |
| Farm owners | Excellent |
| Lodges and hotels | Excellent |
| Offices | Excellent |
| Schools and clinics | Excellent |
| Construction sites | Excellent |
| RV/mobile users | Not ideal |
| Temporary campers | Better with X-Frame Base |
The Starlink Standard Pivot Mount is best for users who want a stable, adjustable, and professional rooftop or wall installation for the Standard Gen 3 / Standard 4X dish.
| Specification | Details |
|---|---|
| Product Type | Roof / wall pivot mount |
| Compatibility | Starlink Standard Gen 3 / Standard 4X |
| Main Use | Sloped roof, wall, fascia and outdoor mounting |
| Installation Type | Permanent / semi-permanent |
| Angle Adjustment | Supported |
| Outdoor Use | Yes |
| Cable Routing Support | Yes |
| Best For | Homes, offices, lodges, farms and rural installations |
| Included Component | Purpose |
|---|---|
| Pivot Mount Base | Main roof/wall support |
| Mast / Adapter Section | Holds the Starlink dish |
| Mounting Screws | Structural fastening |
| Sealant / Sealing Material | Helps reduce water ingress |
| Cable Clips | Cleaner cable routing |
| Installation Guide | Setup guidance |
| Feature | Benefit |
|---|---|
| Weather-resistant materials | Better outdoor lifespan |
| Adjustable pivot design | Better angle control |
| Strong mounting base | Better wind stability |
| Outdoor-grade screws | Safer installation |
| Cable routing support | Cleaner setup |
| Low-profile structure | Neater installation appearance |
| Starlink System | Compatibility |
|---|---|
| Starlink Standard Gen 3 | Yes |
| Starlink Standard 4X / V4 | Yes |
| Starlink Standard Actuated Gen 2 | No, different mount system |
| Starlink Mini | No, Mini uses different mounts |
| Starlink Enterprise | Check mount type |
| Flat High Performance | No |
| Feature | Pivot Mount | Wall Mount |
|---|---|---|
| Best use | Sloped roofs and angled surfaces | Exterior walls and fascia |
| Angle adjustment | Better | Limited |
| Roof compatibility | Excellent | Moderate |
| Wall compatibility | Good | Excellent |
| Permanent installation | Yes | Yes |
| Obstruction management | Strong | Strong |
The Standard Pivot Mount is especially useful where roof angle and dish positioning need more flexibility than a fixed wall mount can provide.
| Surface Type | Suitability |
|---|---|
| Sloped roof | Excellent |
| Shingled roof | Excellent |
| Metal roof | Excellent with proper fixing |
| Fascia board | Good |
| Exterior wall | Good |
| Timber structure | Good if strong |
| Concrete wall | Good with correct anchors |
| Weak thin surface | Not recommended |
| Environment | Suitability |
|---|---|
| Nairobi homes | Excellent |
| Rural farms | Excellent |
| Safari lodges | Excellent |
| Coastal properties | Good with corrosion care |
| Construction sites | Excellent |
| Schools and clinics | Excellent |
| Remote offices | Excellent |
| Roof Type | Pivot Mount Suitability |
|---|---|
| Mild slope | Excellent |
| Steep slope | Excellent |
| Flat roof edge | Good |
| Uneven roofing | Good with professional setup |
| Fragile roofing | Needs caution |
| Obstruction | Pivot Mount Solution |
|---|---|
| Nearby trees | Choose higher roof position |
| Roof overhang | Adjust placement and angle |
| Tall wall | Move to clear side |
| Adjacent building | Install on open-facing roof |
| Water tank | Use roof edge or higher point |
The Pivot Mount works best when installed on a strong surface with enough clearance for the dish and a clear view of the sky.
| Step | Action |
|---|---|
| 1 | Use the Starlink app to check for obstructions |
| 2 | Select a strong roof, wall, or fascia location |
| 3 | Confirm enough clearance around the dish |
| 4 | Mark mounting holes |
| 5 | Drill pilot holes |
| 6 | Apply sealant or waterproofing material |
| 7 | Secure the Pivot Mount base |
| 8 | Attach the mast or adapter section |
| 9 | Install the Starlink Standard dish |
| 10 | Route cable safely |
| 11 | Power on system |
| 12 | Run alignment and speed tests |
| Tool / Material | Purpose |
|---|---|
| Drill | Pilot holes |
| Marker | Hole marking |
| Level | Proper alignment |
| Screwdriver / socket wrench | Tightening screws |
| Silicone sealant | Waterproofing |
| Cable clips | Cable organization |
| Ladder | Roof access |
| Starlink app | Obstruction and setup checks |
| Best Practice | Benefit |
|---|---|
| Install on a structural support | Better long-term stability |
| Check obstructions first | Better Starlink performance |
| Seal drilled holes properly | Reduces water leakage risk |
| Avoid sharp cable bends | Longer cable lifespan |
| Use cable clips or conduit | Cleaner routing |
| Inspect after heavy wind | Maintains safety |
| Mistake | Result |
|---|---|
| Mounting on weak roofing | Instability |
| Skipping sealant | Water leaks |
| Poor cable routing | Cable damage |
| Installing near trees | Signal interruptions |
| Loose screws | Dish movement |
| Ignoring Starlink app alignment | Poor performance |
A proper Pivot Mount installation must balance structural strength, waterproofing, cable safety, and clear sky visibility.
| Weather Condition | Suitability |
|---|---|
| Heavy rain | Good with sealing |
| Strong sun | Excellent |
| Wind | Good with strong fixing |
| Dust | Excellent |
| Coastal humidity | Good with maintenance |
| Stormy areas | Professional installation recommended |
| Stability Factor | Importance |
|---|---|
| Strong mounting surface | Critical |
| Correct screw tightening | Critical |
| Proper angle adjustment | High |
| Cable strain relief | High |
| Regular inspection | Medium |
| Cable Risk | Prevention |
|---|---|
| Sharp roof edge | Use conduit or clips |
| Cable pulling | Leave controlled slack |
| Water entry | Seal entry point |
| Foot traffic | Route away from walking paths |
| UV exposure | Use protective routing where possible |
| Maintenance Action | Frequency |
|---|---|
| Check screw tightness | Every few months |
| Inspect cable route | Monthly |
| Check sealant condition | After heavy rain |
| Run obstruction test | After roof changes |
| Clean around mount | As needed |
Long-term Starlink performance depends on a stable mount, clean cable route, and proper waterproofing around the installation area.
| Mount Type | Best Use |
|---|---|
| Pivot Mount | Sloped roofs and angled surfaces |
| Wall Mount | Exterior walls and fascia boards |
| X-Frame Base | Portable ground setup |
| Pipe Adapter | Pole installations |
| Roof Rack Mount | Vehicle roof racks |
| Mobility Mount | Permanent mobile vehicle setups |
| Feature | Pivot Mount | X-Frame Base |
|---|---|---|
| Permanent installation | Better | |
| Portability | Low | |
| Roof compatibility | Excellent | |
| Ground setup | Poor | |
| Wind stability | Better | |
| Camping use | Not ideal |
| Feature | Pivot Mount | Roof Rack Mount |
|---|---|---|
| Best use | Building roofs | Vehicle racks |
| Mobile use | Poor | |
| Home installation | Excellent | |
| Angle adjustment | Excellent | |
| Vehicle compatibility | No |
| User Need | Recommended Mount |
|---|---|
| Sloped roof installation | Standard Pivot Mount |
| Exterior wall installation | Wall Mount |
| Portable camping setup | X-Frame Base |
| Pole installation | Pipe Adapter |
| Vehicle roof rack setup | Roof Rack Mount |
| RV permanent setup | Mobility Mount |
The Standard Pivot Mount is the right choice for fixed rooftop installations where angle adjustment and structural stability are important.
When buying a Starlink Standard Pivot Mount, the most important issue is not only the mount itself but whether it fits the installation environment. Many Starlink users buy mounts without checking roof type, roof strength, obstruction level, cable route, sealing needs, or whether the mount is correct for their Starlink kit.
This is why buying from Starlite Internet Kenya is a better choice. Starlite helps customers choose the right mounting solution based on roof design, dish type, building height, surrounding trees, cable distance, and long-term use. This reduces the risk of wrong purchases, unstable installations, water leaks, and poor Starlink performance.
Starlite Internet Kenya also supports customers with obstruction checks, rooftop installation guidance, cable routing advice, waterproofing recommendations, Starlink app setup, router placement, Wi-Fi planning, and nationwide support. These services are especially valuable for Kenyan homes, farms, offices, lodges, schools, clinics, and rural compounds where professional placement can make a big difference.
For customers who want reliable Starlink internet, Starlite Internet Kenya provides the local experience needed to install the system safely, cleanly, and professionally in real Kenyan conditions.
It is a roof or wall mounting accessory designed to install the Starlink Standard Gen 3 / Standard 4X dish on angled or sloped surfaces.
Yes. It is designed for Starlink Standard Gen 3 / Standard 4X installations.
No. Starlink Mini uses its own Mini mounting accessories.
Yes. The Pivot Mount is best suited for sloped roof installations where angle adjustment is needed.
Yes, it can be used on some exterior wall and fascia installations depending on the surface and clearance.
Yes. Most permanent Pivot Mount installations require drilling and proper fastening.
Yes. Sealant or waterproofing material should be used around drilled holes to reduce leak risks.
Yes, especially for rooftops, high walls, metal roofs, steep roofs, and commercial locations.
Yes. The Pivot Mount is much better for permanent outdoor installations than the temporary kickstand.
No. For vehicles, use a Roof Rack Mount or Mobility Mount.
Check Starlink kit compatibility, roof type, obstruction level, cable route, and installation location.
From Starlite Internet Kenya for genuine accessories, installation guidance, and nationwide Starlink support.
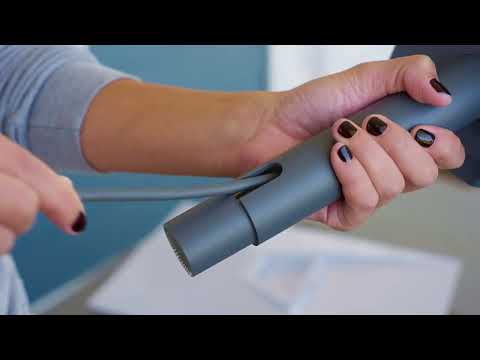
The video above demonstrates how a Starlink Pivot Mount helps users install the dish more securely on roof or wall surfaces where angle adjustment is important. It shows why proper positioning, stable fastening, and clear sky visibility are essential for strong Starlink performance.
It also highlights important setup considerations such as choosing the right mounting surface, checking for obstructions, drilling carefully, sealing installation points, securing the dish, and routing the cable safely. These details matter because poor mounting can lead to water leaks, cable damage, dish movement, and unreliable connectivity.
For Kenyan users, this video is especially useful for planning Starlink Standard installations in homes, apartments, lodges, farms, schools, clinics, offices, and rural compounds where rooftop stability and obstruction management are important.
The Starlink Standard Pivot Mount is one of the best mounting accessories for users who want a strong, adjustable, and professional rooftop installation for the Starlink Standard Gen 3 / Standard 4X dish.
It improves:
rooftop stability
angle adjustment
cable routing
obstruction management
outdoor durability
installation safety
long-term Starlink reliability
For genuine Starlink Standard Pivot Mounts, rooftop installation guidance, obstruction checks, waterproofing advice, cable routing support, and nationwide Starlink setup assistance, visit Starlite Internet Kenya and let Starlite Internet Kenya help you build a reliable Starlink installation anywhere in Kenya.
Hello! How can we help you today?
Start Chat
